Wednesday, March 28, 2012

Stop-Motion Videos!

I have here my two stop-motion videos!  This WOULD be my retouching post, but I lost some of my pictures so I have to do them over.  Ugh. -_-

Anyhow, here's my "Spider-Man vs. Darth Vader" video!


I think it turned out pretty well.  When I initially made the project, mostly everything worked, but Spider-Man couldn't stand, so I decided to have him ride a dragon.  If I were to do the project over, I'd make sure I had an idea of what I wanted to do that I knew would work well when I started, since I had to make some changes in the course of the filming process.  The most difficult part of the project was shooting every single frame without messing anything up too bad, and doing it taught me even more patients and how to import frames into Flash.

And here's my "Tetris" video!  NOTE: This video was not completed due to four simple facts: 1. When I came into class one day, some of the sticky notes were torn down, 2. I didn't have my planning sheet that day, 3. We started a new project on that day, and 4. I wasn't even close to done at the time.  It was also too big for the Blogger server, so I had to upload it on Youtube.  Hopefully it worked.


I'm really proud of this video.  Aside from the fact that the camera kept shifting and people tore down the sticky notes, everything here worked.  If I re-did this project, I would put the sticky notes all on one piece of paper in the shape of the pieces so I wouldn't have to move them one by one.  The most difficult part of making this video was how tedious it was to move the sticky notes one by one, shoot, and move them again, just like the last video.  Doing this video taught me more patience.

Retouching!

Well, it took a while, but I finally have my retouching pictures!

Here's the original picture for the first project.


Now here's my re-touched version.

I'd say this is one of my better retouches.  The skintone seems even for the most part, and everything I tried worked out.  If I re-did this project, I would make the skin slightly more tan and the lips more red.  The most difficult part of this piece was getting a handle for the patch tool.

Here's the unedited version of the second retouch I did.


And the retouched version:


I'd say this is my worst retouch.  I think it still looks alright- no real visible blemishes or anything like that.  However, the patch tool was being difficult, and it created skin that seems somewhat splotchy.  I'd definitely try to fix this if I re-did this project.  The most difficult part was trying to get the skin color to be smooth- and, as you can see, it failed.  Here, I learned how to combine the patch and clone stamp tools to get rid of the hair on her chin.


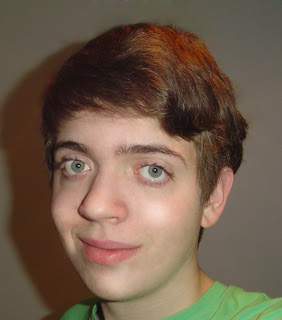
And finally, I edited myself.


Tough task, right?  Well, I tried the best I could.


I'm really proud of this one, mostly because I was actually able to improve my appearance.  Everything worked this time around, and I wouldn't want to fix anything.  The most difficult part was trying to edit the flyaway hair to make it look natural, and it still doesn't really.  It's better, though.  Here I didn't really learn anything new.

That's it!  Stop-motions coming up.

Tuesday, March 13, 2012

Typography!

I WOULD have two stop motion videos here, but I couldn't get one to work, so instead, have my typography project.

I guess you could call it a "flypography." *shot*
I think this project came out quite well.  Mostly everything worked, although there were some parts where the text didn't fit, so I needed to adjust it.  I don't really think I'd change anything if I redid this project.  The most difficult part of this piece was adjusting the text size so it fit well.  When I did this project, I learned how to use the path tool to type in a path.

More stuff coming up soon!

Sunday, March 4, 2012

Color Projects!

It took me way too long to make this post, but I have my projects from the color unit!  First up is my space picture.

In space, no one can hear you make a reference.
As usual, I'm pretty happy with how this one came out.  All the effects worked as I wanted them too, including the comet I added in there.  If I did this project over, I'd probably make the more solid part of the comet match up better with the gradient trail, or vice versa.  The most difficult part of this piece was adjusting the sun so the gradient between white and yellow was just right.  I learned how to create gradients with Photoshop in this project.

Next is the....um....black and white to color project?  I dunno how to describe it, so here's the picture.

 
Yes, that's Bruce Lee.
This isn't my best work, but I still think it's ok. The red part on the foot didn't quite work as I wanted it to, but it's fine.  If I did the project over, I would make the red part a separate, non-blurred layer that would look more detailed.  The most difficult part was adjusting the blending to be as I wanted it to be.  In doing this project, I learned about how to add color to a purely black-and-white image.

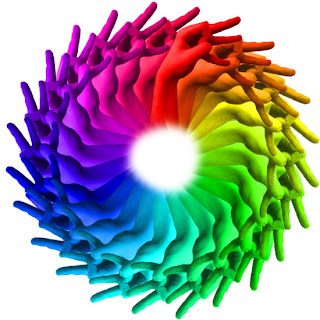
Thirdly is my color wheel.

It's not a gang sign.  It's just a thing I did with my hands.  I swear.
I'd say this is one of my best projects, even though it's really simple.  Almost everything worked, but I apparently forgot one 15-degree interval in rotating the hands.  If I could re-do this project, I'd be more careful with the rotations.  The most difficult part was manually rotating the hands so that they matched up, which I learn could've been a lot easier if I knew how to change the point of rotation.  Doing this project taught me how to use colorizing.

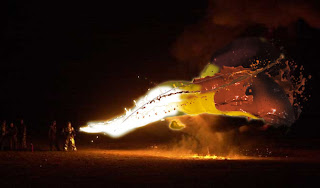
Finally, we have my paint splat project, for which I edited a flamethrower into a paint-thrower.

At least it doesn't have any lead in it.
Despite the fact that it looks like bad CGI from a Spy Kids movie, I think I did pretty good on it.  A lot of the removal of the background worked, especially when I started using the magic wand tool.  If I re-did the project, I....honestly don't think there's anything I'd change.  The most difficult part of this project was arranging the paint splats so they covered the fire enough.  This project taught me various tools to remove backgrounds, as well as patience.

That's about it!  When I get all my recolor pictures gathered, I'll be making a post for those too!